ShopDreamUp AI ArtDreamUp

Deviation Actions
Synaptic Fragments
A view of how my Alien-Hybrid imagination stumbles through this existence via rough sketches and ideas.
$2/month


Suggested Deviants


Suggested Collections


You Might Like…


Description
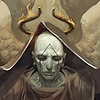
This gif is made up of 7 steps:
1. I always start with a sketch. I delete the white from the original scan using an excessively complex technique. I create a new layer below it and use a very warm grey instead.
2. I want the monster to be mostly green, so I paint in a solid silhouette of dark green. This is usually called a ground layer. I keep my ground color dark most of the time because I like to paint dark to light.
3. My favorite step. I apply and blend in some lighter tones to sculpt the figure. I simply left all the area I didn't feel like doing dark and unfinished..
4. I used a huge brush to start to compose a background to emphasize the parts worth looking at and hide the unfinished crap.
5. I add in a photo of a concrete over the BG layer and set its blending mode to overlay.
6. I took a large brush and painted in some more emphasis over the top on a couple of new layers.
7. I changed the blending mode to one of the layers I just mentioned to soft light to let more of the texture through. I also added a color balance adjustment layer to tweek the colors and contrast.
Image size
352x600px 2.29 MB
© 2007 - 2024 PeteMohrbacher
Comments28
Join the community to add your comment. Already a deviant? Log In
Nice work here!")
Got a curious question though... -why did you remove the "finished" Ebil?!
Got a curious question though... -why did you remove the "finished" Ebil?!